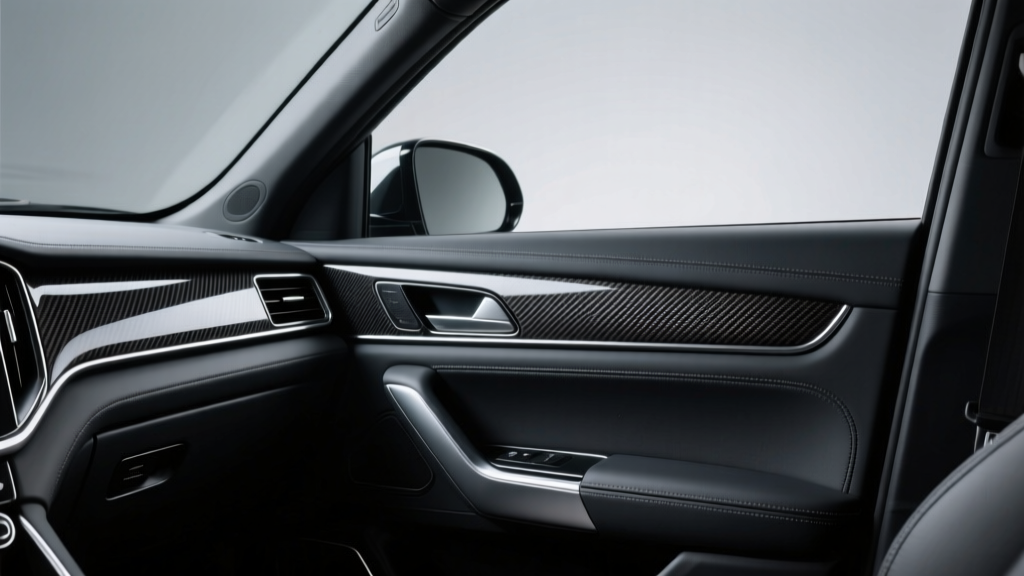
Carbon Fiber Trim for Commercial Vehicles (2026)
Commercial vehicles live a tougher life than most passenger cars. Long shifts, frequent entry and exit, tools sliding around in the cab, and constant sun exposure can leave interior surfaces scratched, faded, and worn. Carbon fiber trim?whether real carbon fiber overlays or high-quality carbon-look kits?has become a popular way to protect high-touch areas while upgrading the cabin?s appearance.
This guide is built for real-world installs on work trucks, vans, and fleet vehicles. You?ll learn what trim options make sense for commercial use, how to prep and install trim so it actually stays put, and what to avoid so you don?t end up with peeling corners or a sticky mess. If you?re trying to make a Sprinter, Transit, F-150, Silverado, Ram, box truck, or service van cabin feel more premium (and easier to keep clean), you?re in the right place.
Done right, carbon fiber interior trim can add durability, improve resale value, and modernize a cab without permanent modifications. Done wrong, it becomes a distraction that lifts at the edges and collects dust. Let?s make sure you land in the first category.
What Counts as ?Carbon Fiber Trim? in a Commercial Vehicle?
Before you buy anything, clarify what ?carbon fiber trim? actually means. Most interior trim kits fall into one of these categories:
1) Real Carbon Fiber Overlays (Rigid)
- What it is: Genuine carbon fiber pieces (often with resin clear coat) designed to overlay factory trim.
- Best for: Long-term durability, premium look, fleet owners wanting a consistent ?upfit? standard.
- Pros: High-end finish, better scratch resistance, stable in heat.
- Cons: Higher cost, can be thicker (fitment needs to be precise).
2) Carbon Fiber Look ABS Trim (Rigid)
- What it is: Molded ABS plastic with a carbon pattern (sometimes hydro-dipped).
- Best for: Value-focused upgrades; common for dash, door switch areas, center stack.
- Pros: Cost-effective, durable, easy to clean.
- Cons: Pattern may not match OEM ?carbon? accents; gloss versions can show fingerprints.
3) Carbon Fiber Vinyl Wrap (Flexible Film)
- What it is: Adhesive vinyl (2D/3D/4D ?carbon? texture), installed by wrapping surfaces.
- Best for: DIY-friendly customization, large surfaces, complex shapes when installed carefully.
- Pros: Budget-friendly, removable, lots of finish options (matte, satin, gloss).
- Cons: More sensitive to heat and edges lifting if not post-heated and sealed properly.
Commercial-vehicle reality check: If your vehicle sits in direct sun or runs hot for long periods (common in delivery vans), rigid overlays with quality automotive tape often outlast budget vinyl. If you want a reversible upgrade or you?re experimenting with a look, vinyl is a smart starting point.
Where Carbon Fiber Trim Makes the Most Sense in Work Trucks and Vans
Focus on areas that get abused daily. These are the best ?ROI? locations for carbon fiber interior trim installation:
- Center console and cupholder surrounds: Prevent scratches from keys, radios, and tools.
- Dash trim strips: Visually modernizes a plain cabin; protects from sun fade.
- Door switch panels: High-touch zone; hides scuffs from gloves and rings.
- Shifter bezel and infotainment frame: Frequent contact; improves cabin appearance fast.
- Steering wheel trim accents: Small pieces that make the interior feel less ?fleet spec.?
Real-world example: On a delivery van that sees 100+ stops per day, the door pull area and window switch panel often show heavy wear within a year. A well-fitted overlay can prevent the shiny, scratched look that makes a cabin feel older than it is.
Tools and Supplies You?ll Want Before You Start
Most carbon fiber trim kits use pre-applied automotive tape, but don?t assume the included materials are enough for commercial use.
Recommended supplies
- Isopropyl alcohol (IPA) 70% or 90%: For surface cleaning and oil removal.
- Lint-free microfiber towels: Avoid leaving fibers under tape.
- Plastic trim tools: For removing factory trim if needed (vinyl wrap installs).
- Heat gun or hair dryer: Helps tape bond and vinyl conform; heat gun preferred for consistency.
- Adhesion promoter (optional but valuable): 3M Primer 94 is common for tough plastics and edges.
- Quality automotive tape (backup): 3M VHB (e.g., 5952) for reinforcement if a piece needs extra hold.
- Nitrile gloves: Prevent skin oils from weakening adhesion.
- Masking tape: For test positioning and alignment guides.
Tip: If you?re installing trim in a vehicle that?s been detailed with interior dressing (shiny protectant), plan extra time for degreasing. Those products are the #1 reason tape fails early.
Choosing the Right Product: What to Look For (and What to Avoid)
Fitment and vehicle-specific design
- Choose vehicle-specific kits whenever possible (year/make/model/trim level).
- Be cautious with ?universal? stick-on pieces for curved or complex surfaces.
- Check if the kit is designed for left-hand drive vs. right-hand drive where applicable.
Finish options: gloss vs. matte vs. satin
- Gloss: Looks premium but shows fingerprints and glare?common complaint in sunny work vans.
- Matte: Best at hiding smudges; more ?OEM-like? in many commercial cabins.
- Satin: Good middle ground; often the most forgiving for daily use.
Adhesive quality
- Look for 3M automotive-grade tape or equivalent.
- Avoid kits with thin, generic tape that doesn?t specify brand or grade.
Quick comparison: overlay kits vs. vinyl wrap
- Overlay kits: Faster install, consistent look, typically stronger hold; cost more.
- Vinyl wrap: Lower cost, flexible customization; more skill-dependent.
Step-by-Step: Stick-On Carbon Fiber Trim Overlay Installation
This is the most common commercial vehicle carbon fiber trim installation method. The goal is a clean surface, correct alignment, and strong tape bonding.
Step 1: Warm the cabin and parts
- Ideal temp range: 65?85�F (18?29�C).
- If it?s cold, run the heater and warm the trim pieces lightly with a heat gun.
Step 2: Test-fit everything first (no tape backing removed)
- Place each piece on the panel and confirm it doesn?t interfere with buttons, knobs, or vents.
- Check door clearance and shifter movement.
- Use small pieces of masking tape as alignment markers.
Tip: On some trucks, the factory trim has subtle texture. If the overlay doesn?t sit flat, don?t force it?consider adding tape in low-contact areas or choosing a different kit.
Step 3: Clean and degrease the surface
- Wipe with a dry microfiber to remove dust.
- Wipe with IPA on a clean microfiber until the towel comes away clean.
- Let the surface air-dry for a minute.
Real-world detail: If the panel feels ?slippery? after alcohol, it may still have silicone dressing on it. Repeat cleaning until it feels squeaky clean.
Step 4: Use adhesion promoter where it counts (optional)
- Apply a thin layer to edges and corners where lifting is most common.
- Let it flash per product instructions (usually a few minutes).
Step 5: Install using a controlled method
- Peel back only a small section of tape liner (1?2 inches) and fold it outward.
- Set the piece into position using your alignment markers.
- Once aligned, pull the tape liner gradually while pressing the part down from the center outward.
Step 6: Apply pressure the right way
- Press firmly along the entire perimeter for 30?60 seconds.
- Focus on corners and thin edges.
- A clean microfiber over your fingers helps distribute pressure without scratching the finish.
Step 7: Heat-set the adhesive
- Gently warm the installed trim (not scorching hot).
- Press again along edges and corners.
Step 8: Cure time
- Avoid cleaning chemicals and heavy handling for 24?48 hours.
- If possible, avoid leaving the vehicle in extreme heat immediately after install.
Step-by-Step: Carbon Fiber Vinyl Wrap Installation (Interior Panels)
Vinyl can look excellent in a commercial vehicle if you take your time. The biggest challenge is edges and compound curves.
Step 1: Remove panels when practical
- Wrapping is easier on a bench than inside a cab.
- Use plastic trim tools and keep track of clips and screws.
Step 2: Clean and prep
- Degrease thoroughly with IPA.
- If the plastic is heavily textured, vinyl may not fully bond?consider an overlay kit instead.
Step 3: Apply vinyl with slack
- Cut a piece with at least 1?2 inches extra on all sides.
- Lay it lightly, then squeegee from the center outward.
- Use heat to conform around curves, gently stretching only as needed.
Step 4: Work edges and recesses carefully
- Don?t overstretch around sharp corners?this causes shrinking and lifting later.
- Use knifeless tape for clean cuts around openings.
Step 5: Post-heat to lock it in
- Post-heat edges and stretched areas (usually around 180?200�F, depending on vinyl spec).
- Press edges down firmly after heating.
Tip for work vehicles: If you wrap a door switch panel, consider sealing the underside edges well. Frequent contact and temperature swings are tough on vinyl edges.
Product Recommendations and Buying Tips (Practical, Not Hype)
Because commercial vehicles vary widely, ?best? depends on how the vehicle is used. Here are reliable categories and what to look for when shopping:
For maximum durability (fleet-friendly)
- Real carbon fiber overlays with a UV-resistant clear coat.
- 3M VHB tape pre-installed (or plan to reinforce with VHB).
- Prefer matte/satin finishes to reduce fingerprints and glare.
For value and easy installation
- ABS carbon-look interior trim kits designed for your exact model.
- Check reviews specifically mentioning heat resistance and edge adhesion.
For customization and frequent changes
- Premium automotive vinyl wrap (look for well-known brands used by wrap shops).
- Choose a finish that matches your cabin: matte carbon often looks more OEM than ultra-gloss patterns.
Shopping checklist:
- Confirm trim compatibility with trim level (XL vs. XLT, Work Truck vs. LT, etc.).
- Verify whether the kit covers push-button start vs. keyed ignition surrounds.
- Look for close-up photos of the weave/pattern and edges.
- Prioritize sellers that provide return policies for fitment issues.
Common Mistakes to Avoid (and How to Get a Pro Result)
- Skipping test-fit: Once tape touches, repositioning can weaken adhesion or break thin pieces.
- Installing over interior dressing: Silicone-based shine products are adhesion killers. Degrease until truly clean.
- Cold-weather installs: Tape bonds poorly when cold. Warm the cabin and parts first.
- Touching the adhesive: Skin oils reduce bond strength. Use gloves or handle by edges.
- Not applying enough pressure: Tape needs firm pressure to wet out and bond to textured plastics.
- Ignoring cure time: Slamming doors, aggressive cleaning, or heavy use right away can lift edges.
- Overstretching vinyl: Stretched vinyl ?wants? to shrink back?leading to lifting at corners.
- Blocking buttons or sensors: On modern trucks/vans, trim can interfere with proximity sensors, hazard switches, or climate controls if misaligned.
Care and Maintenance: Keeping Carbon Fiber Trim Looking Good
- Cleaning: Use a mild interior cleaner and a microfiber towel. Avoid harsh solvents.
- Fingerprints: Matte/satin hides them; gloss may need more frequent wipe-downs.
- UV protection: Park in shade when possible; consider a windshield sunshade for vans.
- Edge checks: For the first week, press down any corners that look like they?re starting to lift (especially after a hot day).
Commercial use tip: If you?re managing a fleet, standardize your cleaner and train drivers not to use degreasers or ammonia-heavy products on trim pieces.
FAQ: Commercial Vehicle Carbon Fiber Trim Installation
Will carbon fiber trim peel in hot weather?
It can if the surface wasn?t properly cleaned, the install was done in cold temps, or the kit uses weak tape. Using automotive-grade tape (3M VHB), applying firm pressure, and heat-setting the adhesive dramatically improves heat resistance?especially in delivery vans parked in the sun.
Is real carbon fiber worth it over carbon-look ABS?
For heavy-use commercial cabins, real carbon fiber overlays tend to hold up better long-term and look more authentic. ABS carbon-look kits offer strong value and are often ?good enough? if you choose a vehicle-specific set with quality tape.
Can I remove stick-on trim later without damaging the interior?
Usually, yes. Warm the piece with a heat gun, peel slowly, and remove tape residue with an adhesive remover safe for interiors. Aggressive pulling on cold tape is what tends to damage soft-touch plastics.
What if my interior panels are textured?
Heavily textured plastics are harder for tape and vinyl to bond to. Overlays with thicker, high-quality tape and an adhesion promoter on edges work better than vinyl wrap on rough texture.
Do I need adhesion promoter for every install?
Not always, but it?s a smart upgrade for commercial vehicles, especially on corners, thin edges, and areas exposed to heat. Use it sparingly and only where the tape will contact.
How long does installation take?
A simple overlay kit for a center console area can take 30?60 minutes including prep. A full interior trim kit may take 2?4 hours. Vinyl wrapping multiple panels can take an afternoon or more depending on experience and panel complexity.
Next Steps: Plan Your Install Like a Pro
Start by choosing the right trim type for your vehicle?s working conditions?overlay kits for speed and durability, vinyl for flexible customization. Set aside time for proper cleaning and test-fitting, and don?t rush the pressure and heat-setting steps. Those small details are what separate a trim upgrade that lasts years from one that starts lifting next month.
If you?re ready to move forward, make a quick checklist today:
- Confirm exact vehicle fitment (year/make/model/trim).
- Decide on gloss vs. matte/satin based on glare and fingerprints.
- Buy IPA, microfiber towels, and (ideally) adhesion promoter.
- Pick an install day with mild temps or plan to warm the cabin.
Explore more interior upgrade and installation guides on carinteriormix.com to keep your cab looking sharp, comfortable, and ready for the next shift.